Transform Trash to Treasure: Beautiful Furniture Projects Anyone Can Make
Transform outdated furniture into stunning statement pieces while creating sustainable furniture options for your home. Breathe new life into forgotten pieces through strategic refinishing, creative repurposing, and modern design techniques that blend vintage charm with contemporary style. Whether you’re rescuing a curbside dresser or reimagining inherited furniture, upcycling delivers unique, personalized pieces that tell a story while reducing environmental impact.
Master the art of furniture transformation with basic tools and materials found at local hardware stores. From chalk paint techniques that skip intensive prep work to innovative hardware swaps that instantly modernize dated pieces, upcycling offers endless possibilities for creating high-end looks on a budget. Even beginners can achieve professional results by starting with simple projects like side tables or chairs before tackling larger pieces.
Join the growing community of creative DIY enthusiasts who see potential in every scratched surface and wobbly leg. Transform your space with one-of-a-kind pieces that showcase your creativity while contributing to a more sustainable future – all while saving thousands on furniture costs.
Essential Tools and Materials for Furniture Upcycling
Must-Have Tools
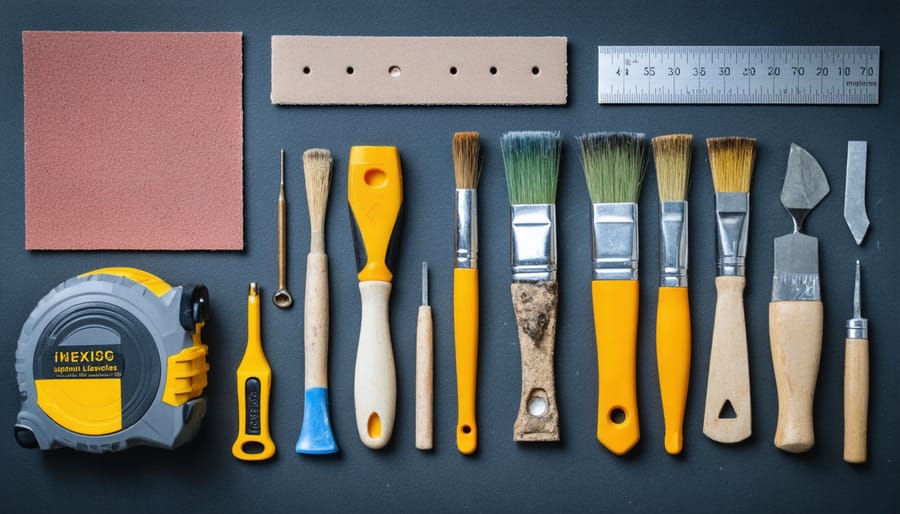
Before diving into your upcycling project, gather these essential tools to ensure smooth sailing through your furniture transformation journey. A quality electric drill with various drill bits is indispensable for both disassembly and creating new connections. You’ll also need a comprehensive screwdriver set, including both Phillips and flathead varieties in multiple sizes.
For surface preparation, invest in sandpaper of varying grits (80, 120, and 220 are most useful) and a power sander to make quick work of larger areas. A sturdy putty knife and wood filler are crucial for repairing dents and holes. Don’t forget basic measuring tools: a tape measure, level, and carpenter’s square will ensure precise work.
For finishing touches, gather paintbrushes in various sizes, foam rollers for smooth application, and paint trays. A heat gun can be invaluable for removing old paint or varnish, while pliers and a hammer will help with hardware removal and installation. Safety equipment is non-negotiable – always keep protective goggles, work gloves, and a dust mask on hand.
Remember, investing in quality tools upfront will save you time and frustration in the long run, making your upcycling projects more enjoyable and professional-looking.
Finishing Materials
The finishing touches can make or break your upcycled furniture project. Start with quality eco-friendly paints that not only look great but are better for your home’s air quality. Choose between chalk paint for a vintage look, milk paint for a natural finish, or acrylic paint for durability. For wooden pieces, consider water-based stains that bring out the natural grain while being environmentally conscious.
Don’t forget to protect your masterpiece with the right sealant. Polyurethane works well for high-traffic pieces like tables and chairs, while wax is perfect for decorative items. For a natural option, try tung oil or linseed oil – they’re great for bringing out wood’s natural beauty while providing protection.
For metallic touches, look for low-VOC spray paints or brush-on metal paints. Remember to always prep your surface properly with primer when needed, and sand between coats for a professional finish. Consider using decorative glazes or crackle medium for adding character and aged effects to your pieces.
5 Popular Furniture Upcycling Projects
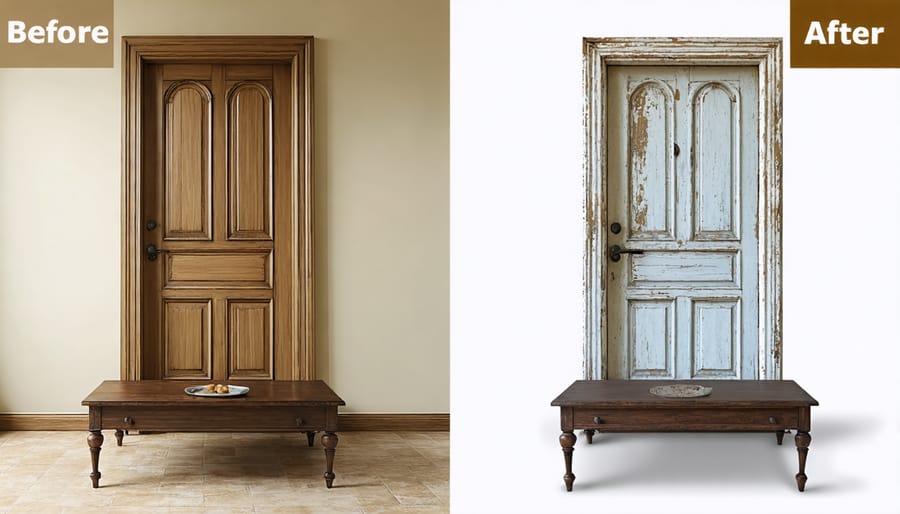
Old Door to Stylish Coffee Table
Transform an old door into a stunning coffee table with this weekend-worthy project. Start by thoroughly cleaning your door and removing any hardware. Sand the surface completely, paying special attention to rough spots and old paint. If you’re keeping the door’s vintage look, focus on smoothing while preserving the patina.
For the table base, cut 4×4 posts into four legs, each 16-18 inches long. Sand the legs smooth and attach them to the door’s corners using heavy-duty L-brackets. Ensure they’re perfectly level by measuring twice before securing. For added stability, install a support brace between the legs on each end.
To protect your new table’s surface, apply several coats of polyurethane, letting each layer dry completely. If you’re planning to use the table for dining or drinks, consider adding a piece of custom-cut glass on top. This preserves the door’s character while creating a practical surface.
For a unique touch, keep interesting hardware like old hinges or the doorknob in place. These details add character and become conversation pieces. You can also add a lower shelf by cutting a piece of plywood to size and attaching it between the legs for extra storage.
Choose your finish based on your decor – distressed paint for shabby chic, dark stain for rustic farmhouse, or sleek white for modern spaces. Remember to add furniture pads under the legs to protect your floors.
Dresser to Kitchen Island
Transform your old dresser into a stylish and functional kitchen island with this budget-friendly project. Start by removing all drawers and giving the dresser a thorough cleaning. Sand down the entire piece to create a smooth surface for painting or staining. Consider keeping some drawers operational for storage while replacing others with open shelving for added versatility.
Install a solid countertop – butcher block is an excellent choice for its durability and warm aesthetic. Cut the butcher block to size, allowing for a 6-12 inch overhang on one side to create a breakfast bar. Secure it firmly to the dresser frame using L-brackets and appropriate screws.
Add functional elements like towel bars on the sides, hooks for hanging utensils, or a wine rack in place of a drawer. Install heavy-duty casters on the bottom to make your island mobile – be sure to choose locking wheels for stability when parked.
For the finishing touches, paint or stain your island in a color that complements your kitchen. Consider adding a protective polyurethane coating to both the body and countertop for increased durability. Replace old drawer pulls with modern hardware to complete the transformation.
Remember to reinforce the internal structure if needed, especially if you’re planning to store heavy items. This project typically takes a weekend to complete and breathes new life into both your old dresser and kitchen space.
Ladder to Bookshelf
Transform an old wooden ladder into a stunning bookshelf with this creative upcycling project. Start by thoroughly cleaning your ladder and sanding down any rough spots or splinters. If needed, repair any loose rungs using wood glue and clamps. Once the ladder is stable, decide whether to keep its vintage look or paint it to match your decor.
For a more polished appearance, apply primer and your chosen paint color, or simply seal the natural wood with a clear protective finish. To create shelving spaces, measure and cut wooden planks to fit across the rungs – these will serve as your book platforms. Pine or reclaimed wood works great for this purpose.
Secure each plank to the ladder rungs using L-brackets underneath for added stability. Space your shelves at varying heights to accommodate different book sizes. For a professional touch, sand the edges of your shelf planks and finish them to match or complement the ladder.
Consider adding small rubber feet to the ladder’s base to prevent scratching your floor and ensure stability. You can also install wall anchors at the top for extra security. Style your new bookshelf with a mix of books, small plants, and decorative objects for a Pinterest-worthy display that combines functionality with vintage charm.
Remember to test the stability of each shelf before loading it with books, and avoid overloading the upper rungs to maintain balance.
Suitcase to Side Table
Transform a vintage suitcase into a charming side table with this simple weekend project. You’ll need a sturdy vintage suitcase, hairpin legs or wooden table legs (16-20 inches), a mounting plate, screws, a drill, and basic tools.
Start by thoroughly cleaning your suitcase inside and out with mild soap and water. Let it dry completely. If the suitcase has a musty smell, leave it open in sunlight for a day and place activated charcoal inside to absorb odors.
Next, reinforce the bottom of the suitcase by cutting a piece of plywood to fit inside. Secure it with wood glue and small screws around the edges. This creates a stable base for mounting the legs.
Position your mounting plates evenly at each corner of the suitcase’s bottom. Mark your drilling points carefully. Pre-drill holes through both the plywood and suitcase material, then attach the mounting plates with screws.
Screw in your chosen legs, ensuring they’re all level. If using hairpin legs, consider adding rubber feet to prevent floor scratching. For extra stability, you can add cross-bracing between the legs.
The interior of the suitcase offers hidden storage – perfect for remote controls, magazines, or cozy throws. Add decorative fabric lining or leave the original interior for vintage charm. Position your new side table next to a reading chair or sofa for a conversation-starting piece that combines style and function.
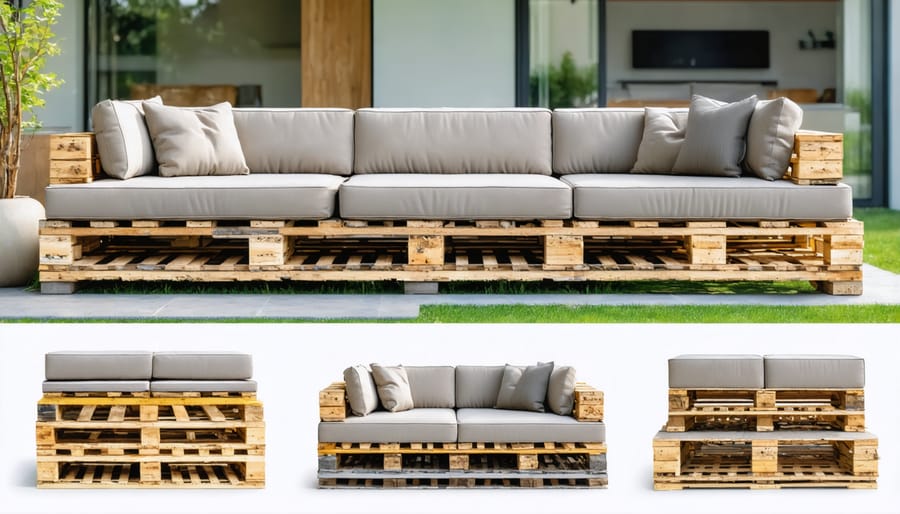
Pallets to Outdoor Furniture
Transform old wooden pallets into stunning outdoor furniture with this simple yet rewarding DIY project. Start by thoroughly cleaning and sanding your pallets, ensuring they’re free from splinters and rough spots. Be sure to check for a “HT” stamp, indicating heat treatment, which makes them safe for home use.
For a basic pallet sofa, you’ll need two pallets for the base and one for the backrest. Stack the base pallets securely, connecting them with screws through the support blocks. Attach the backrest pallet vertically using L-brackets for stability. Sand all surfaces again after assembly for a smoother finish.
Add weather-resistant cushions to transform your creation into comfortable seating. Consider using outdoor fabric in bright colors or patterns to add personality to your space. For added durability, apply several coats of exterior wood sealant to protect against moisture and UV damage.
Want to expand your outdoor setup? A matching coffee table is just one pallet away – simply add casters to the bottom for mobility. For a more polished look, fill any gaps with wood filler before painting or staining. Popular finish options include whitewashing for a coastal vibe or dark stain for a modern industrial feel.
Remember to position your finished pieces away from direct rain exposure and consider adding furniture covers for extended protection during harsh weather.
Tips for Success
Success in furniture upcycling comes down to proper preparation and attention to detail. Here are essential tips to ensure your projects turn out beautifully:
Always start with thorough cleaning and preparation. Remove all hardware, sand surfaces properly, and repair any damage before beginning. This foundational step determines the quality of your final piece.
Choose the right materials for your specific project. Research eco-friendly furniture materials and finishes that suit your piece’s intended use and location. For example, waterproof finishes are crucial for bathroom or outdoor furniture.
Common mistakes to avoid:
– Rushing the prep work
– Skipping primer when needed
– Using indoor paint for outdoor pieces
– Not testing colors or finishes first
– Applying new paint before old finish is completely dry
Take photos before you begin and document your process. This helps if you need to reassemble hardware and provides a reference for future projects.
Consider the piece’s final location and purpose before starting. This affects your choice of materials, colors, and finishing techniques. For instance, high-traffic pieces need more durable finishes.
Temperature and humidity matter significantly. Work in a well-ventilated area between 60-80°F with moderate humidity for optimal results. Extreme conditions can affect drying time and finish quality.
Keep your tools clean and organized. Clean brushes thoroughly between coats and store materials properly to extend their life and ensure consistent results.
Finally, don’t rush the process. Allow adequate drying time between coats and resist the urge to use the piece before it’s fully cured. Patience often makes the difference between an amateur and professional-looking result.
Furniture upcycling isn’t just a hobby – it’s a meaningful way to reduce waste, express creativity, and create unique pieces that tell a story. By giving old furniture a second life, you’re not only saving money but also contributing to environmental sustainability while developing valuable DIY skills. The satisfaction of transforming a worn-out piece into something beautiful and functional is truly unmatched.
Throughout this guide, we’ve explored various techniques, from basic refinishing to more complex transformations. Remember that every piece of furniture has potential, and with the right tools, materials, and patience, you can create stunning pieces that reflect your personal style. Whether you’re a beginner starting with a simple paint job or an experienced DIYer ready to tackle structural modifications, the possibilities are endless.
Start small, but dream big. Begin with a simple side table or chair before moving on to larger projects. Don’t be afraid to make mistakes – they’re valuable learning opportunities. Join online communities, share your projects, and learn from fellow upcyclers. Document your transformations with before-and-after photos to inspire others and track your progress.
Ready to start your upcycling journey? Look around your home or visit local thrift stores for that perfect piece waiting to be transformed. With some creativity, effort, and the techniques we’ve shared, you’ll soon be creating beautiful, sustainable furniture that adds character to your space while helping the planet.