")
Transform Your Dated Fireplace in a Weekend (No Contractor Needed)
Transform your dated fireplace into a stunning focal point with simple, budget-friendly updates that can be completed in a weekend. Like many DIY home improvement projects, a fireplace makeover delivers dramatic results without requiring professional expertise. Paint your existing brick or stone with high-heat masonry paint for an instant modern look, install a floating wood mantel to add architectural interest, or apply peel-and-stick tiles for a complete transformation that costs under $100. Whether your style leans contemporary, farmhouse, or classic, these beginner-friendly techniques can help you reimagine your fireplace while maintaining its structural integrity.
The best part? These updates require basic tools you likely already own and can be reversed if you change your mind later. From whitewashing brick to updating hardware and adding decorative touches, your fireplace makeover options are limitless. This guide will walk you through the most impactful yet achievable ways to refresh your hearth, complete with material recommendations and step-by-step instructions for flawless results.
Before You Begin: Planning Your Fireplace Makeover
Safety First: What You Need to Know
Before diving into planning your DIY fireplace project, it’s crucial to prioritize safety. First, check with your local building department about permit requirements for fireplace modifications. Even cosmetic changes might need approval, especially in older homes or historic districts.
Ensure your fireplace has been recently inspected by a certified chimney sweep. They can identify any underlying issues that need addressing before your makeover begins. If you’re painting or applying new materials, proper ventilation is essential. Open windows and use fans to maintain good air circulation throughout the project.
When working with any adhesives or sealants, wear appropriate protective gear including safety glasses, gloves, and a dust mask. Keep a fire extinguisher nearby, and never work on a warm fireplace – wait at least 24 hours after its last use. If you’re removing old materials, test for asbestos first, particularly in homes built before 1980. When in doubt about any safety aspect, consult a professional. Remember, a beautiful fireplace isn’t worth compromising your safety.
Gathering Your Materials and Tools
Before starting your fireplace makeover, gather these essential materials and tools. For most basic makeovers, expect to spend between $100-300 total, depending on your chosen finishes.
Essential Materials:
– TSP cleaner ($8-10)
– High-heat primer ($15-20)
– High-heat paint ($20-30)
– Paintbrushes and rollers ($15-25)
– Painter’s tape ($5-8)
– Drop cloths ($10-15)
– Sandpaper (various grits) ($8-12)
– Cleaning rags ($5)
– Face mask and safety goggles ($15-20)
Optional Materials (based on your design choice):
– Tile and mortar ($3-8 per sq ft)
– Tile spacers ($5)
– Grout ($15-20)
– Stone veneer ($8-15 per sq ft)
– Construction adhesive ($8-10)
– Peel-and-stick tiles ($25-40 per pack)
Tools You’ll Need:
– Putty knife ($5-8)
– Level ($10-15)
– Measuring tape ($5-8)
– Bucket for cleaning ($5)
– Wire brush ($8-10)
– Utility knife ($5)
– Caulk gun ($8)
Consider borrowing tools from friends or renting specialty items to keep costs down. Always purchase a bit extra of your main materials to account for mistakes or future touch-ups.
Quick and Easy Fireplace Facelift Options
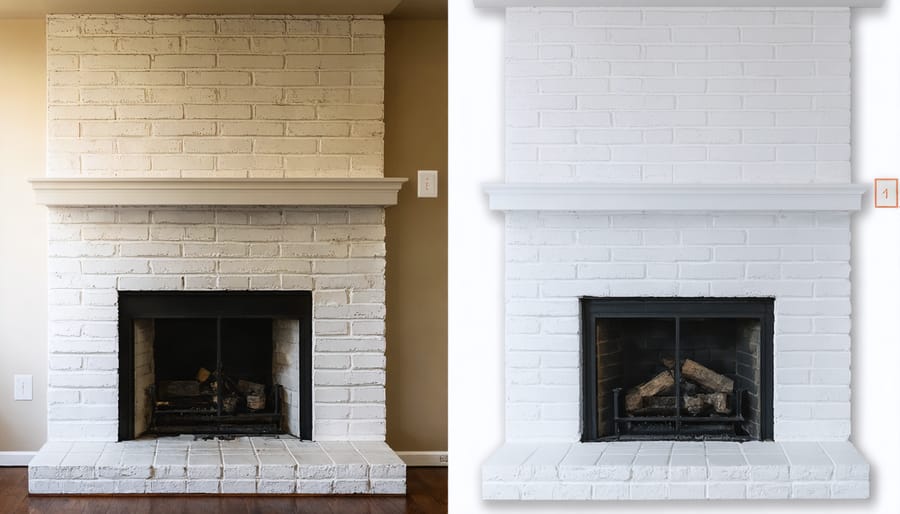
Paint and Whitewash Transformations
A fresh coat of paint or whitewash can completely transform your dated fireplace into a modern focal point. Before starting, thoroughly clean the surface using a wire brush and vacuum to remove soot, dust, and debris. For brick or stone, apply a quality masonry primer and allow it to dry completely – typically 24 hours.
For painting, choose a heat-resistant masonry paint in your desired color. Using a high-density foam roller, apply thin, even coats, working from top to bottom. Pay special attention to grout lines and crevices with an angled brush. Two to three coats usually provide optimal coverage, allowing each layer to dry thoroughly between applications.
If you prefer a more rustic look, consider whitewashing. Mix equal parts white latex paint and water for a translucent finish that lets some of the original texture show through. Apply the mixture with a brush, working in small sections. Immediately dab excess with a clean cloth for a natural, weathered appearance. For more coverage, reduce the amount of water in your mixture.
For both techniques, protect surrounding areas with painter’s tape and drop cloths. Don’t forget to ventilate the space well and wear a mask during application. Once complete, wait at least 48 hours before using your fireplace to ensure proper curing.
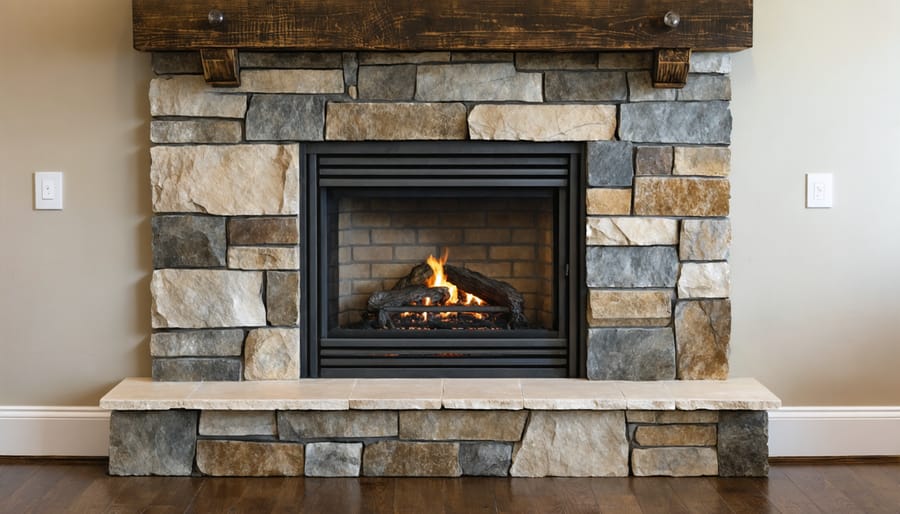
Tile and Stone Veneer Applications
Transforming your fireplace with tile or stone veneer is one of the most impactful ways to achieve a stunning makeover. Before starting, review key fireplace design considerations to ensure your chosen materials complement your space.
Begin by thoroughly cleaning the existing surface and checking that it’s stable enough to hold the new material. For tile applications, use a cement board as your backing surface, securing it firmly to the existing structure. When working with stone veneer, apply a metal lath followed by a scratch coat of mortar to create a proper bonding surface.
Start from the bottom and work your way up, using spacers for tiles or following the manufacturer’s guidelines for stone veneer. For tiles, apply thinset mortar with a notched trowel, pressing each piece firmly into place. With stone veneer, use a specialty mortar mix, applying it to both the wall and the back of each stone.
Pay special attention to corners and edges, using special corner pieces or mitered cuts for a professional finish. Allow proper drying time between steps, typically 24-48 hours, before applying grout for tiles or filling joints between stones. Finish with appropriate sealer to protect your new surface and enhance its appearance.
Remember to maintain proper clearance around the firebox and use only materials rated for fireplace use.
Mantel Updates and Additions
The mantel is often considered the crown jewel of any fireplace, and updating it can dramatically transform your room’s appearance. If you’re looking to restore and update old features, start by thoroughly cleaning your existing mantel and assessing its condition.
For a simple update, consider painting your current mantel. Sand the surface lightly, apply primer, and finish with 2-3 coats of quality paint. Popular choices include crisp white for a classic look or deep navy for modern appeal.
To install a new mantel, first measure your fireplace opening and add 12 inches on each side for proper proportions. Purchase a pre-made mantel shelf or create your own using medium-density fiberboard (MDF) or solid wood. Secure mounting brackets to the wall using a level, ensuring they’re anchored into wall studs. Most mantels can be mounted using heavy-duty brackets and construction adhesive.
For a custom look, consider wrapping your existing mantel with reclaimed wood or adding decorative trim pieces. Crown molding beneath the shelf adds elegant detail, while simple wooden blocks can create a craftsman style. Always ensure your mantel meets local building codes for clearance above the fireplace opening – typically 12 inches minimum for safety.
Finishing Touches That Make a Difference

Lighting Upgrades
Transforming your fireplace’s lighting can dramatically enhance its ambiance and create a stunning focal point in your room. Start by considering LED strip lights, which can be easily installed under the mantel or along the inside edges of the fireplace. These strips come with adhesive backing and offer color-changing capabilities through smartphone apps, perfect for setting different moods.
For a more traditional look, install battery-operated sconces on either side of your fireplace. Many modern options come with remote controls and don’t require any electrical work. Picture lights mounted above artwork on the mantel can add sophistication while highlighting your decor.
If your fireplace isn’t functional, consider placing a cluster of flameless candles inside. These battery-powered alternatives create a warm, flickering effect without any fire hazard. For a modern twist, try incorporating uplighting by placing small LED spotlights at the base of your fireplace, angled to wash light up the facade.
Don’t forget about the mantel decor – add small accent lights behind vases or picture frames for subtle illumination. Battery-operated puck lights are perfect for this purpose and can be easily concealed. Remember to choose lights with similar color temperatures (warm white is usually best) to maintain a cohesive look that enhances your fireplace’s new appearance.
Decorative Screens and Accessories
Once you’ve updated the basic structure of your fireplace, the right decorative elements can truly elevate its appearance. A decorative screen is both functional and stylish, with options ranging from simple black mesh designs to ornate brass-finished pieces. Consider a screen with geometric patterns for a modern look, or opt for a classic sunburst design for traditional spaces.
Fireplace tools displayed on an elegant stand can serve as both practical accessories and decor pieces. A matching set in oil-rubbed bronze or brushed nickel can create a cohesive look. Don’t forget about the mantel – layer varying heights of candle holders, vintage mirrors, or botanical elements to create visual interest.
For a cozy touch, arrange oversized lanterns or hurricane vases filled with LED candles on the hearth. These provide ambient lighting without the maintenance of real flames. Decorative logs or birch branches can fill an unused fireplace during warmer months, while woven baskets keep real firewood organized and add texture to the space.
Wall art or a statement mirror above the mantel can complete the look, but remember to maintain proper clearance for heat safety. For seasonal flexibility, consider creating a rotating display of accessories that you can easily swap out as the seasons change, keeping your fireplace fresh and relevant throughout the year.
Maintenance Tips for Your Updated Fireplace
Now that you’ve given your fireplace a stunning makeover, it’s essential to maintain its fresh appearance with proper care and attention. Regular maintenance not only preserves your hard work but also extends the life of your updated fireplace.
Start by establishing a weekly cleaning routine. Dust the surface with a soft, dry microfiber cloth to prevent buildup. For painted surfaces, avoid abrasive cleaners that could damage the finish. Instead, use a slightly damp cloth with mild soap when needed, and always dry thoroughly to prevent water marks.
If you’ve installed tile or stone, seal the surface every 12-18 months to protect against stains and moisture. Watch for any signs of grout deterioration and address repairs promptly to prevent more extensive damage. For brick surfaces, inspect regularly for chips or cracks in the paint or whitewash, touching up as needed to maintain a fresh appearance.
Keep decorative elements clean and rotate them seasonally to prevent permanent dust accumulation. If you’ve added a wooden mantel, treat it with appropriate wood care products every six months to maintain its luster and protect against heat damage.
For working fireplaces, schedule annual professional chimney inspections and cleanings. This ensures your beautified fireplace remains safe and functional. After each use, clean ash and debris carefully to prevent staining on your updated surfaces.
Monitor any caulk or sealant applications around your fireplace, particularly where different materials meet. These areas may need occasional touch-ups to maintain a clean appearance and prevent moisture intrusion.
Finally, consider keeping small amounts of your paint, tile, or other materials used in the makeover for future touch-ups. Store these properly labeled with the date and project details for easy reference when needed.
By following these maintenance guidelines, your DIY fireplace makeover will continue to be a stunning focal point in your home for years to come.
Transforming your fireplace doesn’t have to be an overwhelming project. As we’ve explored throughout this guide, there are numerous ways to breathe new life into your hearth without breaking the bank or requiring professional expertise. From simple paint updates and tile applications to more creative solutions like whitewashing brick or installing a modern mantel, these DIY fireplace makeovers can dramatically improve your home’s aesthetic and value.
Remember that the key to success lies in proper preparation and patience. Take time to thoroughly clean your fireplace surfaces, gather all necessary materials, and plan your design before diving in. Don’t be afraid to start small – even minor changes like updating hardware or adding decorative accessories can make a significant impact.
The best part about these DIY fireplace projects is their flexibility. You can tackle them in stages, spreading the work and cost over time while still achieving beautiful results. Whether you have a weekend to spare or want to make gradual improvements, these makeover techniques can adapt to your schedule and budget.
Ready to get started? Take another look at your fireplace with fresh eyes, choose the approach that best suits your style and skill level, and begin your transformation journey. With the right preparation and a creative mindset, you’ll soon have a stunning focal point that you can proudly say you upgraded yourself. Your dream fireplace is just a DIY project away!