Flatten Your Floors: 5 Proven Fixes for Uneven Floors in Old Houses
Diagnose uneven floor issues by checking for foundation settling, rotted joists, or poor original construction common in old houses. Repair minor unevenness with leveling compound for concrete or wood filler for floorboards. Fix sagging joists by sistering new lumber alongside the original. For major settling, consult a foundation specialist to assess the need for jacking up and stabilizing the foundation.
Identify the Cause
Warning Signs
Several warning signs can indicate your old house has uneven floors. Keep an eye out for visible gaps or spaces between the floor and baseboards, which suggest the floor is no longer level. Doors that stick or won’t latch properly, as well as windows that are hard to open or close, can also be red flags. Another telltale sign is if your furniture, such as tables or chairs, wobble or sit unevenly on the floor. If you notice any of these issues, it’s time to investigate further and consider repairs to level your floors.
Check the Crawl Space or Basement
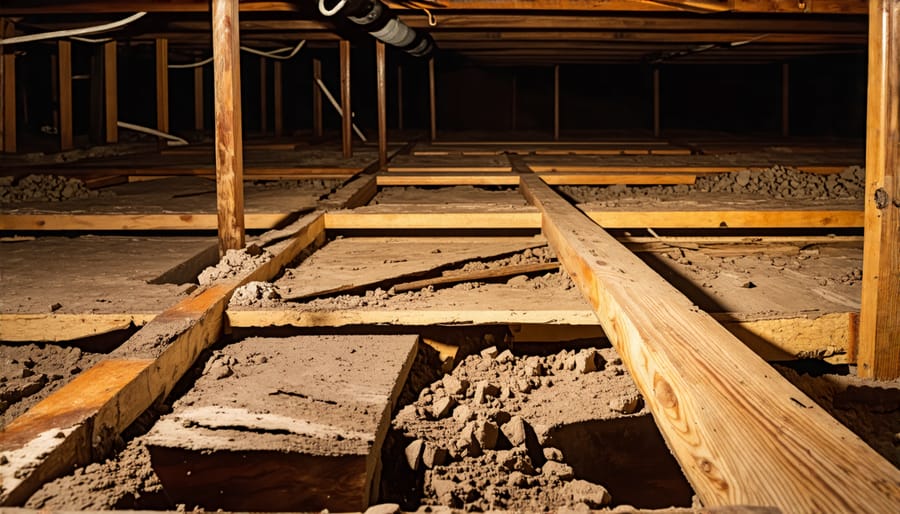
Venture into the crawl space or basement to investigate the root causes of your uneven floors. Look for signs of water damage, rot, or mold on the floor joists and subflooring. Excessive moisture can lead to warping and sagging over time. Check for any cracked or broken floor joists that may have weakened due to age or termite damage. Identify any joists that appear to be pulling away from the subflooring above.
Examine the support columns and posts for signs of settling, shifting, or deterioration. Ensure that each column is properly seated on its footing and securely connected to the beams above. Assess the main carrying beams for any noticeable sagging, twisting, or splitting. Pay special attention to the areas beneath load-bearing walls, fireplaces, and bathtubs, as these heavy features can contribute to uneven floors if not adequately supported.
While in the crawl space, also check for any signs of foundation issues, such as cracks in the concrete walls or footings, which could be causing the floor above to sink or become unlevel. By thoroughly examining the structure beneath your floors, you’ll be better equipped to determine the best course of action for restoring evenness and stability.
Fix 1: Repair Joists and Subflooring
To repair sagging joists and replace rotted subflooring, start by identifying the affected areas. Look for soft spots, visible sagging, or bouncy sections of the floor. Once you’ve located the problem, remove the floorboards or cut an access hole in the ceiling below to expose the joists.
Inspect the joists for signs of damage, such as rot, cracks, or excessive sagging. If the joists are severely damaged, they may need to be replaced entirely. To do this, install temporary support beams on either side of the damaged joist. Cut the old joist out using a reciprocating saw, and carefully remove it.
Measure the length of the new joist needed, and cut it to size using a circular saw. Place the new joist into position, ensuring it is level and properly aligned with the existing joists. Secure the new joist to the header and rim joists using joist hangers and galvanized nails.
If the joists are only slightly damaged or sagging, you can sister them with new lumber. Cut a new joist to the same length as the damaged one, and apply construction adhesive to one side. Clamp the new joist tightly against the old one, ensuring they are flush and level. Drill pilot holes through both joists, and secure them together using bolts or lag screws.
Next, address any damaged or rotted subflooring. Cut out the affected areas using a circular saw set to the depth of the subfloor. Install new subflooring panels, ensuring they are flush with the existing subfloor. Secure the new panels to the joists using construction adhesive and subflooring screws.
Sand any uneven edges for a smooth transition, and fill any gaps with wood filler. Allow the adhesive and filler to dry completely before replacing the floorboards or patching the access hole.
By repairing sagging joists and replacing rotted subflooring, you can create a solid, level foundation for your floors, eliminating unevenness and ensuring the longevity of your home’s structure.
Fix 2: Pour Self-Leveling Underlayment
Self-leveling underlayment is an excellent solution for seriously uneven floors or when you need a perfectly smooth subfloor for installing new flooring. This pourable, cementitious compound is designed to seek its own level, filling in low spots and creating an even surface.
Before applying the underlayment, repair any major damage and clean the subfloor thoroughly. Next, prime the surface according to the manufacturer’s instructions to ensure proper bonding. Mix the self-leveling compound with water as directed, then pour it onto the floor, starting at the farthest corner from the entrance. Use a gauge rake to help distribute the material evenly.
As you work, use a smoother tool to remove any air bubbles and further even out the surface. Let the underlayment dry completely, which typically takes a few hours to a day, depending on thickness and room conditions. Once cured, the self-leveling compound provides a smooth, even surface ready for your new flooring installation.
Keep in mind that self-leveling underlayment works best for filling dips and creating a level surface, but it’s not intended to correct significant structural issues. It’s also essential to follow the manufacturer’s guidelines for surface preparation, mixing, and application to achieve the best results. With the right approach, self-leveling underlayment can help you achieve perfectly even floors in your old house.
Fix 3: Install Shims
Installing shims is an effective way to level low spots in your floor before installing new flooring. To start, locate the uneven areas by placing a long straightedge across the floor and identifying where gaps appear. Cut your shims to size, then gently tap them into place under the straightedge using a rubber mallet until the surface is level. For larger low spots, you may need to use multiple shims stacked together. Be sure to check the level frequently as you work and adjust the shims as needed. Once satisfied with the results, apply a generous amount of construction adhesive to the subfloor and the top of each shim to lock them securely in place. Allow the adhesive to dry completely according to the manufacturer’s instructions before proceeding with your new flooring installation. By taking the time to properly shim low areas, you’ll ensure a stable, even foundation for your new floors that will look great and last for years to come.
Fix 4: Use Transition Strips
When floors are slightly uneven between rooms, a simple solution is to install transition strips. These thin, flat strips are designed to bridge the gap and create a smooth transition. Typically made of wood, metal, or vinyl, they come in various finishes to match your flooring. To install, measure the width of the uneven area and cut the strip to size. If dealing with different flooring heights, choose a transition strip with a slight slope. Secure the strip to the floor using adhesive or nails, ensuring it sits flush against both surfaces. With careful installation, transition strips effectively disguise minor unevenness, creating a seamless flow between rooms. It’s an affordable and straightforward fix that can greatly improve the overall appearance of your home’s flooring.

Fix 5: Embrace the Unevenness
If you’ve decided to embrace your old home’s character, uneven floors can add a unique charm. Consider highlighting the unevenness with contrasting flooring materials or patterns. For example, use a checkerboard tile pattern or mix wood and tile to accentuate the floor’s quirks. You can also use area rugs strategically to soften the transitions between different levels.
Another creative approach is to incorporate the uneven floors into your furniture layout. Place a cozy reading nook or a built-in bookshelf in a corner where the floor dips, creating a snug and inviting space. Use the unevenness to your advantage by creating multi-level seating areas or adding steps to create a unique flow between rooms.
Lastly, embrace the imperfections by showcasing them with lighting. Install dimmer switches or use soft, indirect lighting to create a warm and inviting ambiance that celebrates the character of your old home’s floors.
Fixing uneven floors in an old house can be a challenging but rewarding project. By identifying the root cause and choosing the appropriate repair method, you can level out your floors and add character to your home. Whether you opt for a simple fix like a self-leveling compound or take on a more involved repair like sistering joists, leveling your floors will not only improve the appearance of your space but also enhance its functionality and safety. With a little patience and the right tools, you can transform your old, uneven floors into a beautiful, level foundation for your home.