Blooming Beauty: Create a Stunning Spring Wreath in 5 Easy Steps
Welcome spring into your home with a gorgeous DIY wreath bursting with seasonal charm! With just a few simple supplies and easy-to-follow steps, you’ll craft a stunning cherry blossom wreath or other spring-themed masterpiece to grace your front door. Gather silk flowers, ribbons, and decorative accents in fresh spring hues, then let your creativity bloom as you design a one-of-a-kind wreath celebrating the beauty and promise of the season. Get ready to impress guests and passersby with your stylish handiwork!
Step 1: Gather Your Supplies
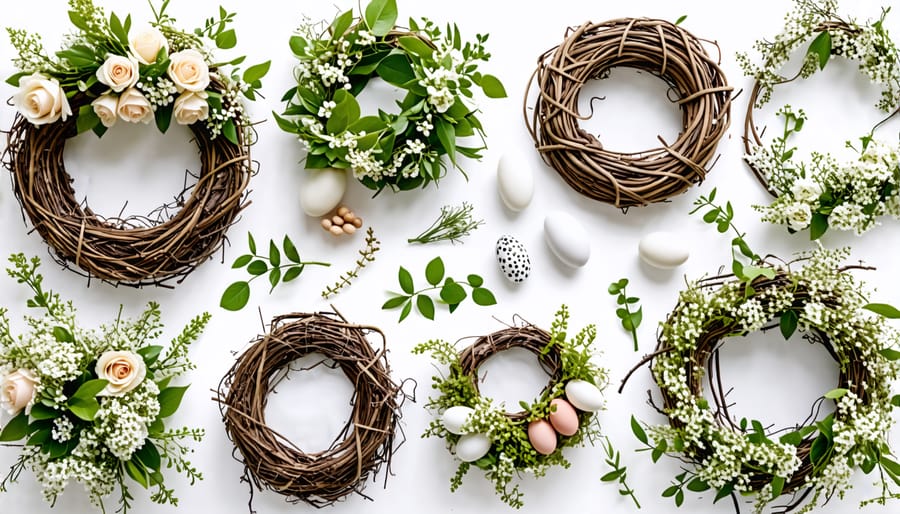
Wreath base
The base of your spring wreath can be made from various materials. Grapevine wreaths offer a rustic, natural look and are sturdy enough to hold heavier decorations. Straw wreaths are lightweight and affordable, perfect for a quick seasonal update. Foam wreaths provide a smooth surface for attaching delicate elements like florals. Choose the base that best fits your design vision and budget.
Floral elements
Choose a variety of artificial spring blooms like tulips, daffodils, forsythia, cherry blossoms, and hyacinths in soft pastel shades. Mix in lush greenery such as faux eucalyptus, boxwood, ferns, and moss to create a full, vibrant look. Aim for a balance of colors and textures for a stunning, lifelike effect.
Other decorations
To add extra flair to your spring wreath, consider weaving in colorful ribbon or attaching decorative eggs, butterfly ornaments, or small bird nests. Mini chalkboard signs with seasonal messages can also be a charming touch. Have fun personalizing your wreath with any embellishments that evoke the joyful spirit of springtime!
Step 2: Create Your Base
To create the base for your spring wreath, start with a grapevine wreath form, available at most craft stores. If the wreath feels too loose or uneven, gently adjust the vines until you achieve a pleasing shape. For a fuller look, consider wiring two wreath forms together. Next, attach a loop of ribbon or twine to the back of the wreath for easy hanging. If you plan to add a sign or other large decorations, secure a piece of floral wire to the wreath base where you want to place the accent. This will make attaching your embellishments much easier in the next step.
Step 3: Add the Greenery
Now it’s time to start building the lush, natural foundation of your spring wreath. Begin by selecting several full stems of greenery, such as eucalyptus, fir, or boxwood. Lay the stems around the wreath form, overlapping them slightly and adjusting until you achieve a balanced, visually appealing arrangement.
To secure the greenery, use a paddle of 22-gauge floral wire. Starting at one end of a stem, wrap the wire tightly around both the stem and the wreath form. Continue wrapping at intervals along the stem, ensuring it is held firmly in place. Tuck the end of the wire discreetly underneath the greenery.
Repeat this process with additional stems, layering them to conceal the wreath form and create a thick, naturalistic base. Vary the placement and direction of stems for a dynamic, organic appearance. Step back periodically to assess the overall shape and fullness, making adjustments as needed.
For a professional look, use sharp floral snips to trim any wayward twigs or uneven ends. Once satisfied with the greenery placement, mist it lightly with water to help preserve its fresh appearance. Your wreath is now ready for embellishment with spring blooms and accents.

Step 4: Arrange the Flowers
Focal point flowers
Now it’s time to add the showstopping blooms that will be the focal point of your spring wreath. Choose the largest, most vibrant flowers in your selection. Silk peonies, roses, dahlias, or magnolias work beautifully for this. Begin by positioning these statement flowers slightly off-center on your wreath base. Play around with the arrangement until you find a balanced, visually appealing placement. Affix the flowers securely to the base using a hot glue gun or floral wire. These focal point flowers will draw the eye and serve as the anchoring element that the rest of your floral arrangement will be built around.
Filler flowers
Once you’ve added your main flowers, take a look at your wreath and identify any gaps or bare spots. This is where filler flowers come in! Choose smaller blooms and buds, like baby’s breath, wax flower, or small roses, to fill in these spaces and create a lush, abundant look. Trim the stems to the appropriate length and insert them into the wreath base, using the same technique as with your main flowers. Feel free to mix and match different filler flowers for added texture and visual interest. Keep stepping back to assess your wreath as you go, ensuring an even distribution of color and fullness.
Step 5: Embellish and Hang
Now that your spring wreath is assembled, it’s time for the finishing touches! Consider adding a few extra embellishments to make your wreath truly unique. A beautiful ribbon bow in a complementary color can provide an elegant focal point. Weave in some faux birds or butterflies for a whimsical touch of nature. Sprinkle in a few more sprigs of greenery or floral stems to fill any gaps and create a lush, abundant look.
When you’re satisfied with your design, it’s time to display your masterpiece! Wreaths are incredibly versatile decor pieces that can brighten up any space. The classic location is on your front door to create a welcoming entrance. However, spring wreaths also look lovely hung above a fireplace mantel, as a cheerful accent on an interior door, or as a centerpiece on a dining room wall. Use a wreath hanger, ribbon, or a few strategically placed nails to securely fasten your wreath.
Stand back and admire your beautiful handiwork! With its vibrant colors and natural textures, your DIY spring wreath will enliven your home and boost your mood every time you see it. Making your own wreath is a fun and rewarding project that allows you to welcome spring with a personalized touch.
Conclusion
Creating a beautiful spring wreath is a fun and rewarding project that allows you to welcome the season with a personalized touch. By following these simple steps and using your favorite flowers, greenery, and embellishments, you can craft a one-of-a-kind wreath that perfectly suits your style and home decor. Don’t be afraid to experiment with different color combinations, textures, and materials to make your wreath truly unique. This project is just one of many other DIY projects you can tackle to spruce up your home for spring. Pair your beautiful new wreath with some seasonal outdoor decor to create a cohesive and inviting look that celebrates the arrival of warmer weather and fresh beginnings. So, gather your supplies, let your creativity flow, and enjoy the process of making a stunning spring wreath that will brighten your home and impress your guests.