Make Your Outdoor Space Shine: Pro-Level Lighting Design That Works
Transform your outdoor space into a perfect outdoor oasis with strategic lighting that enhances both safety and aesthetics. Layer three distinct lighting types – ambient, task, and accent – to create depth and functionality in your landscape. Position pathway lights at 18-24 inch heights, spaced 6-8 feet apart, illuminating walkways without creating harsh spotlight effects. Install motion-sensor security lights at entry points and dark corners, mounting them 8-10 feet high for optimal coverage while minimizing glare.
Start with low-voltage LED systems that consume 75% less energy than traditional bulbs while lasting up to 25 times longer. Choose warm white lights (2700-3000K) for entertaining areas and cooler temperatures (4000K) for security zones. Control light pollution by directing fixtures downward and using shields to prevent light trespass onto neighboring properties.
Smart lighting technology now allows precise control over brightness, timing, and color temperature through smartphone apps, creating dynamic scenes for different occasions while maintaining energy efficiency. Proper outdoor lighting design balances security, ambiance, and sustainability, transforming evening spaces into inviting extensions of your home.
Safety First: Essential Lighting for Security and Navigation
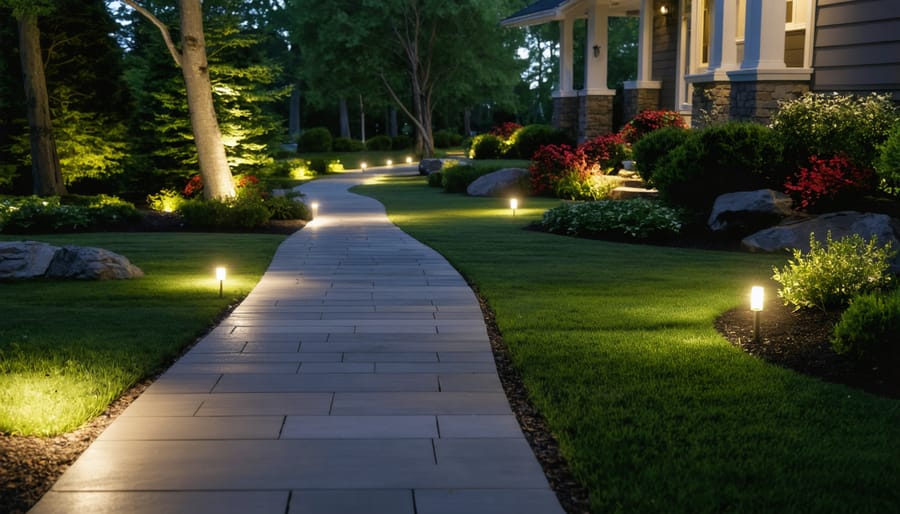
Path and Step Lighting Essentials
Proper path and step lighting isn’t just about aesthetics – it’s crucial for safety and navigation after dark. For walkways, install lights at 8-10 foot intervals, positioning them slightly off the path to prevent tripping hazards while effectively illuminating the walking surface. Aim for low-intensity lights around 2-4 watts for LED fixtures to provide adequate visibility without creating harsh glare.
When it comes to steps, each tread should be clearly lit to prevent accidents. Mount lights at step height on alternate sides or use dedicated step lights installed directly into risers. The goal is to eliminate shadows that could obscure the edges of steps. Consider motion sensors for energy efficiency – they’ll activate lights only when needed and help reduce your energy bills.
For both paths and steps, use warm white light (2700-3000K) to create an inviting ambiance while maintaining visibility. Opt for fixtures with glare shields or downward-facing designs to minimize light pollution and avoid disturbing neighbors. Remember to use weather-resistant fixtures rated for outdoor use, and always check local building codes for specific requirements regarding outdoor step lighting.
Security Lighting Placement
Strategic security lighting begins with identifying vulnerable areas around your property, such as entry points, walkways, and dark corners. Position motion-sensing lights 6-12 feet above ground level at all main entry points, including doors, garages, and gates. These fixtures should illuminate a radius of 20-30 feet for optimal coverage.
For driveways and pathways, install lights at regular intervals that create overlapping zones of illumination to eliminate dark spots. Place fixtures on both sides of long driveways for comprehensive coverage. Consider mounting lights under eaves or on sturdy poles to prevent tampering.
When installing motion sensors, aim them slightly downward and away from busy streets to prevent false triggers from passing cars or pedestrians. Position sensors to detect movement across their field of view rather than directly toward them for better sensitivity.
Remember to illuminate potential hiding spots like dense shrubbery or alcoves. Use lower-intensity, constant lighting for these areas to maintain visibility without creating harsh shadows that could provide cover for intruders. Adjust your security lights seasonally to account for changes in foliage and lighting conditions.
Creating Ambiance: Landscape Lighting Techniques
Tree and Plant Lighting
Strategic tree and plant lighting can transform your garden into a stunning weather-ready outdoor space that looks magical after sunset. Start by identifying your property’s focal points – mature trees, decorative shrubs, or flowering plants that deserve the spotlight.
For trees, use uplighting techniques with well-lights or spotlights placed at the base, angled upward to highlight the trunk and canopy. This creates dramatic shadows and depth, while showcasing the tree’s natural architecture. For best results, position two or three lights around larger trees to prevent harsh shadows and ensure even illumination.
When lighting smaller plants and shrubs, opt for softer, diffused lighting using path lights or adjustable micro-spotlights. These fixtures should be placed slightly away from the plants to create a gentle wash of light that highlights foliage without overwhelming it. Consider using color-changing LED lights to enhance seasonal displays or create different moods throughout the year.
Layer your lighting by combining different techniques. Use downlighting from tree branches to create moonlight effects on plants below, and cross-lighting to eliminate dark spots and add dimension. Remember to adjust lighting seasonally as plants grow and change, and always use weather-resistant fixtures rated for outdoor use.
For energy efficiency, connect your plant lighting to smart controls that adjust brightness based on time of day or motion detection. This not only saves energy but also extends the life of your lighting system.

Water Feature and Garden Lighting
Water features and garden elements can transform your outdoor space into a magical nighttime retreat when properly illuminated. For ponds and fountains, consider submersible LED lights that create a mesmerizing glow from within the water. Position lights at different depths to achieve a layered effect, and aim them upward to capture the movement of water droplets and create sparkling reflections.
For garden lighting, start by identifying your focal points – whether they’re prized plants, sculptures, or architectural features. Use well lights or spotlights positioned at the base of larger plants to create dramatic uplighting effects. For flower beds, opt for path lights with wider beam spreads to softly illuminate multiple plants at once.
Consider the seasonal changes in your garden when planning your lighting. Install adjustable fixtures that can be redirected as plants grow or change throughout the year. For trees, combine uplighting at the base with downlighting from above to create natural-looking moonlight effects through the branches.
Smart lighting solutions can enhance your water and garden features even further. Install color-changing LEDs to adjust the mood for different occasions, or set up motion sensors to create interactive lighting experiences as you move through your garden. Remember to use warm white lights (2700-3000K) for most garden applications, as they complement natural elements better than cool white lights.
Smart Technology Integration

Automated Controls and Scheduling
Modern outdoor lighting systems offer incredible flexibility through automated controls and smart scheduling features. By incorporating smart home integration, you can easily program your lights to turn on at sunset and off at sunrise, saving energy while maintaining security.
Most systems now come with user-friendly mobile apps that let you control your outdoor lights from anywhere. You can create custom schedules for different occasions – brightening pathways for evening gatherings, dimming decorative features late at night, or activating security lights when motion is detected.
Motion sensors are particularly valuable for both security and convenience, automatically illuminating areas when someone approaches and turning off after a set time. For special events, many systems offer preset “scenes” that adjust multiple lights simultaneously to create the perfect ambiance.
To maximize energy efficiency, consider combining timers with photocells that measure natural light levels. This ensures your lights only operate when truly needed, reducing unnecessary power consumption while maintaining your desired lighting effects throughout the year.
Energy-Efficient Solutions
Modern LED technology has revolutionized outdoor lighting, offering incredible energy savings while delivering superior illumination. These fixtures use up to 75% less energy than traditional bulbs and can last 25 times longer, making them a smart investment for any outdoor lighting project.
To maximize energy efficiency, consider installing motion sensors and timers. Motion sensors ensure lights activate only when needed, perfect for security lighting and less-trafficked areas. Timers can automatically adjust lighting schedules based on sunset and sunrise, eliminating wasteful daytime operation.
Solar-powered lights offer another eco-friendly option, particularly for pathway lighting and accent features. While their initial brightness may be less intense than wired alternatives, they’re perfect for areas far from power sources and require zero electricity costs.
For existing fixtures, smart switches and dimmers can reduce energy consumption while creating ambiance. Many smart systems allow you to control lighting zones via smartphone apps, setting different brightness levels for various times and occasions. Look for fixtures with the ENERGY STAR certification to ensure you’re getting the most efficient options available.
Remember to position lights strategically to minimize the number of fixtures needed while maintaining adequate coverage. This approach not only saves energy but also reduces light pollution and operating costs.
DIY Installation Tips
Tools and Materials
To create an effective outdoor lighting design, you’ll need several essential tools and materials. Start with a voltage tester and electrical tape for safety during installation. A power drill, screwdrivers (both flathead and Phillips), wire strippers, and pliers are crucial for mounting fixtures and handling wiring.
For planning, grab a measuring tape, graph paper, and pencils to sketch your layout. Consider having a light meter to measure existing light levels and identify dark spots. If you’re installing low-voltage lighting, you’ll need a transformer and outdoor-rated electrical cable.
The main lighting materials should include weather-resistant fixtures appropriate for your climate, LED bulbs in your desired color temperature, mounting brackets, and waterproof wire connectors. Don’t forget ground stakes for path lights and junction boxes for hardwired fixtures.
For smart lighting integration, prepare a smart hub controller and compatible bulbs or fixtures. Keep spare bulbs, wire nuts, and weatherproof covers on hand. Finally, ensure you have safety equipment like work gloves, safety glasses, and a sturdy ladder for installation at height.
Installation Steps
Before starting any installation, gather your tools: wire strippers, voltage tester, weatherproof wire connectors, and a power drill. Always prioritize safety by turning off the power at the circuit breaker before beginning work.
Start by planning your lighting layout on paper, marking where fixtures will go and how wiring will run. Dig trenches 12-18 inches deep for underground wiring, following local building codes. If you’re unsure about electrical work, consult a licensed electrician.
Mount light fixtures securely to solid surfaces, using appropriate anchors for your wall material. For pathway lights, insert stakes firmly into the ground, ensuring they’re level and properly spaced. When installing security lights, position them 8-10 feet high and angle them slightly downward to minimize glare.
Connect wiring using weatherproof wire nuts and junction boxes. Seal all connections thoroughly with silicone caulk to prevent moisture intrusion. For low-voltage systems, install the transformer near a GFCI outlet and connect fixture wires according to the manufacturer’s instructions.
Test each fixture before permanently securing connections. Check that motion sensors and timers function correctly. Program smart lighting controls through your home automation system if applicable.
Finally, adjust fixture angles and brightness levels during nighttime hours to achieve desired illumination. Clean all fixtures and inspect connections one last time. Remember to document your installation with photos and notes for future maintenance.
Keep spare bulbs and any programming instructions in an easily accessible location. Regularly inspect your outdoor lighting system for damage and clean fixtures every few months to maintain optimal performance.
Creating the perfect outdoor lighting design doesn’t have to be overwhelming. By following these guidelines, you can transform your outdoor space into a well-lit, inviting, and secure environment. Remember to start with a solid plan, focusing on key areas like pathways, entrances, and focal points. Layer your lighting for depth and functionality, and don’t forget to consider energy efficiency through LED fixtures and smart controls.
Take the time to evaluate your specific needs, whether it’s enhancing security, creating ambiance, or highlighting architectural features. Start small if needed – you can always expand your lighting system over time. Consider working with a professional for complex installations, but don’t be afraid to tackle simpler projects yourself.
As technology continues to evolve, take advantage of smart lighting solutions that offer convenience and energy savings. Regular maintenance and seasonal adjustments will ensure your outdoor lighting remains effective and beautiful year-round. With these guidelines in hand, you’re ready to create an outdoor lighting design that enhances your property’s beauty, safety, and functionality.